 Protector: Reclaiming the Throne is the sequel of the great Defense game Protector (walkthrough available here). Many new ideas to improve your gaming experience in this addictive game.
Disclaimer:
This excellent Protector 2 walkthrough was written by NorthernPolarity and originally posted at COCAK. We just made a few changes in the format so NorthernPolarity deserves all the credit for the strategy guide.
@ COCAK you'll find the latest Kongregate related news and walkthroughs for your badges.
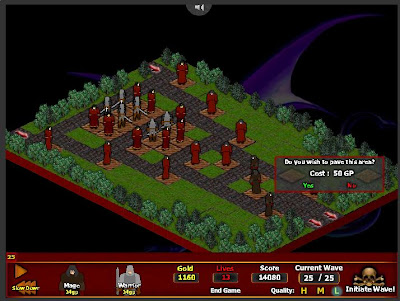
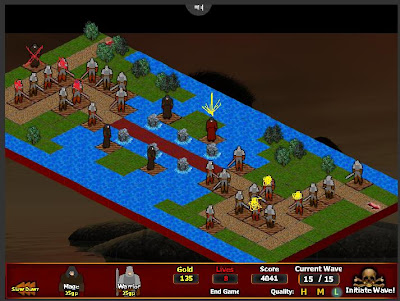
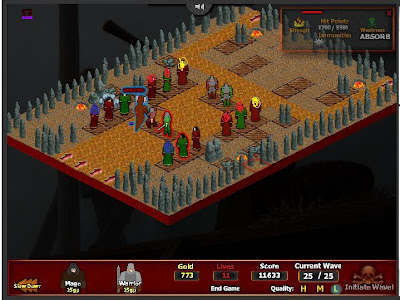
New Home

Unit Builds:
Warriors:Level 2: Left Fire, Middle Energy, Right Cold
Level 3: Armor Pierce
Level 4: Generalist
Level 5: Tactician
Strategy:
1 - Build 3 warriors, upgrade them as appropriate when you have the gold, spread out as evenly as you can.Lower Karnagh
Mage: Empowerment

Unit Builds:
Mages in the Middle:Front Two / Back Two
Level 2: Cold / Fire
Level 3: left cripple, right infect / right cripple, left infect
Level 4: Generalist
Level 5: Inflictor
Mages Near the Entrance:
Front Two / Back Two:
Level 2: Fire
Level 3: Debuff / Slow
Level 4: Specialist
Level 5: Inflictor
Strategy:
1 - Build middle 4 first.Right before Wave 3: Upgrade everyone to level 2. (or when possible)
RBWave4: Level Cold guys to level 3.
RBWave 5: 3 mages up top, build the last one after this wave ends. Leaked boss.
2 - Upgrade red guys to level 3 when permitted.
Upgrade all the top guys to level 2.
Upgrade all the top guys to level 3.
Upgrade the middle 2 blue guys to level 4 asap (once you have gold and are done with the top guys).
3 - Guys near the entrance to level 3.
By now you should have plenty of gold, upgrade everyone as soon as possible.
4 - Right before wave 15 you should have lots of gold. Just build lots of mages in your empty slots (Not showed in the picture)
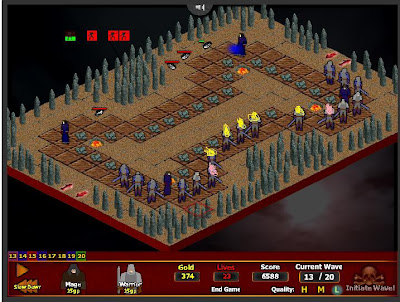
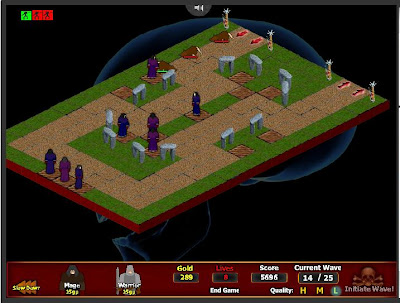
Upper Karnagh
Mage: Empowerment, Cold Focus

Unit Build:
Mages in the MiddleLevel 2: Cold
Level 3: Top 2 cripple, bottom infect
Level 4: Generalism
Level 5: Inflictor
Level 6: Large Increase
Mages near the top
Level 2: Cold
Level 3: Top 2 debuff, bottom slow
Level 4: Specialism
Level 5: Inflictor
Mass Mages:
Level 2: Cold
Level 3: Who cares
Strategy:
1 - Start off by building 3 mages in the middle square.RBWave 2:Upgrade 2 mages to level 2. One shouldn't be able to, upgrade asap.
RBWave 4:Upgrade 2 mages to level 3, including bottommost one. Upgrade other asap.
Upgrade all 3 mages to level 4, asap.
2 - RBWave8: Build the top 3 mages. Upgrade them to level 3 asap.
Upgrade any bottom mage that you can to level 5.
3 - Upgrade your mages when you can from now on.
At around wave 13, instead of making warriors like I foolishly did, mass a lot of mages on your other tiles, starting with the ones that can cover the most space. I had a lot of gold, but chose not to use it, and hence leaked a lot.
Coastal Ruins
Mage: Empowerment, Fire Focus
General: Frugal
Unit Build:
Mages in Middle PlatformLevel 2: Fire
Level 3: Top 2 Cripple, Bottom 2 Infect
Level 4: Generalism
Level 5: Inflictor
Level 6: Large Increase
Mages at the 4 corners of the top platform:
Level 2: Fire
Level 3: Top 2 Debuff, Bottom 2 Slow
Level 4: Specialism
Level 5: Inflictor
Level 6: Large Increase
Mass Mages:
Level 2: Fire
Level 3: Whatever
Level 4: Generalism
Warriors on 2 platforms (not in picture, but recommended)
Level 2: Physical
Level 3: Armor Pierce
Level 4: Generalist
Level 5: Tactician
Skill Build:
1 - Build 4 mages in the middle platform with 4 tiles.RBWave 3: Upgrade everyone to level 2.
RBWave 6: Upgrade everyone to level 3.
RBWave 7: Upgrade everyone to level 4 (asap for the ones that can't yet).
RBWave 9: Add 4 mages at the 4 corners of the top platform. Upgrade middle platform mages to level 5 asap.
Upgrade your units when you can.
2 - RBWave 14, Add 4 warriors to the top platform (do so once you have to gold for it). Pave the middle of the middle platform, and add 2 warriors there when you can. Upgrade everyone when you can.
RBWave 20, use all your gold to add mages to all of your remaining unused tiles, starting from the small islands on the bottom then to the sides. Don't make any more mages after this level for now. Instead, Upgrade your units some more.
RBWave 22, again, use all your gold to add mages to the remaining unused tiles. This time, continue to do so until you fill up all the tiles. Upgrade any units that you can during this time that can still attack the people.
Continue upgrading your units.
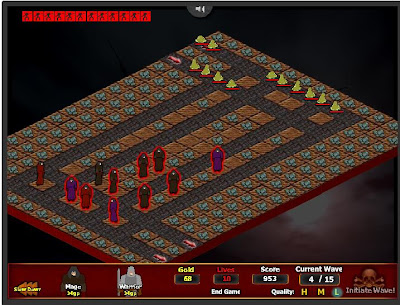
Achirion Wastes
Warrior: Ferocity, Frozen Forging,
General: Hardy, Tough
Unit Build:
Warriors:Level 2: Cold
Level 3: Critical
Level 4: Generalism
Level 5: Tactician
Level 6: Damage
Top 2 Mages:
Level 2: Cold
Level 3: Infect
Level 4: Specialism
Level 5: Inflictor
Level 6: Large Increase
Bottom 2 Mages:
Level 2: Cold
Level 3: Slow
Level 4: Specialism
Strategy:
1 - Start off with 2 mages up top (1 near each entrance) and 4 wars on bottom, building from the center outwards for warriors. Add in another warrior when you have a chance. These 5 warriors are marked with yellow. Upgrade your top 2 mages and warriors to level 2 asap.2 - RBW3, Add the final 2 warriors on the bottom (the pink ones). Upgrade your mages to level 3 asap.
Don't forget to upgrade your warriors to level 2 as well.
RBW5: add the bottom 2 mages.
RBW6: Upgrade everyone, then start making warriors on the bottom, building outwards to the center. Do this until you complete the setup in the picture.
2 - Start upgrading everyone, prioritizing your mages first (upgrade them before you upgrade any warriors from now on), and upgrade your warriors from the inside outwards.
Wave 8 was a little tight, but upgrade your warriors to level 2 during it and you should be fine.
(I had level 4 top mages, all but 2 level 2 warriors, and 2 level 3 warriors.)
3 - Upgrade upgrade upgrade.
Be sure not to make any new units for now, despite the lots of gold.
4 - RBWave 15: fill up the remainder of slots with warriors. Do it RBW16 as well.
Be sure to upgrade your stuff asap. Focus on your bottom warriors, but don't neglect to upgrade the top ones that can still attack during wave 18 to level 2.
Be sure to upgrade the ones near the bottom cold mages asap though.
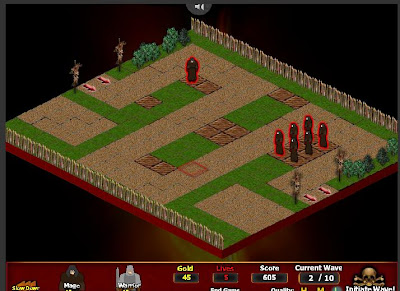
Collapsed Shrine
Mage: Empowerment, Fire Focus, Energy Focus, Destruction,
General: Hardy (or Frugal if you want, doesn't really matter)
Unit Builds:
Bottom 4 Mages / The Other Bottom MagesLevel 2: Fire/Energy (Half/Half)
Level 3: Debuff
Level 4: Generalist
Level 5: Destruction
Level 6: Massive Damage
Lone Guy In The Middle (Uppermost one)
Level 2: Energy
Level 3: Debuff
Level 4: Specialism
Level 5: Inflictor
Level 6: Increased Duration
Strategy:
1 - Build the bottom 4 guys, and the one guy closest to the middle (the purple one thats a little to the right of the middle). Upgrade them evenly, being sure to make sure the mage on the end gets some exp.2 - RBWave10: Make the other 4 mages that are above the bottom 4. Upgrade when appropriate.
Decrepit Passage
Mage: Empowerment, Fire Focus, Energy Focus, Destruction, Quickspell, Magical Might

Unit Builds:
Middle/Top Middle Platform Mages and Your Mass MagesLevel 2: Fire/Energy (Half/Half)
Level 3: Debuff
Level 4: Generalist
Level 5: Destruction
Level 6: Massive Damage
Level 7: Generalism
Bottom Middle Platform Mages
Level 2: Fire/Energy
Level 3: Debuff
Level 4: Specialism
Level 5: Inflictor
Strategy:
Start off by building 4 mages in the middle of the middle platform.RBWave4: Upgrade them all to level 2.
RBWave5: Upgrade as many as you can to level 3
RBWave6: Add the 2 mages on the bottom part of the middle platform.
RBWave7: Add the 2 mages on the top part of the middle platform.
Upgrade anyone whenever, prioritizing your new mages and lower leveled ones.
During wave 16, start filling up remaining tiles with mages. Finish filling remaining tiles, but stop to upgrade any units that might have leveled.
After you complete your mage deployment upgrade anyone whenever.
Old Shaven Road
Mage: Empowerment, Fire Focus, Poison Focus, Destruction
General: Hardy, Frugal, Miser
Unit Build:
Bottom Platform MagesLevel 2: Poison
Level 3: Debuff/Slow (Half/Half)
Level 4: Generalist
Level 5: Destruction
Level 6: Massive Damage
Level 7: Generalism
Top/Middle Platform Mages
Level 2: Poison
Level 3: Infect
Level 4: Specialism
Level 5: Inflictor
Level 6: Large Increase
Level 7: Specialism
Level 8: Large Increase
Strategy:
1 - The beginning of this level requires precise timing, so play on slow settings for now. Start off with the mage up top, and upgrade it to level 2 as soon as it levels. As soon as you have the gold, build a mage on the bottom right corner of the bottom platform. As soon as it levels, upgrade that one to level 2. From now on, just fill up the bottom platform as soon as you have the gold. After you do that, switch back to fast settings.2 - Now, upgrade the bottom platform mages evenly. Don't upgrade the top mage though.
3 - RBW8: Upgrade your top guy to the max.
4 - Now just upgrade your units as soon as they level.
The Forgotten Bridge
Warrior: Ferocity, Lava Forging, Physical Forging, Finesse, Frozen Forging, Intimidation General: Frugal, Miser
Unit Build:
Warriors:Level 2: Fire
Level 3: Critical
Level 4: Generalism
Arrow Mage:
Level 2: Fire
Level 3: Debuff
Other Mages:
Level 2: none
Strategy:
1 - Start with 2 warriors on bottom, marked in red. Add 1 more red marked as soon as you have the gold. Add the red arrow mage on the bridge, and upgrade all your warriors to level 2.RBW3: upgrade your warriors to level 3
RBW4: add the 4 blue marked warriors up top (treat the Xed out mage as a warrior)
2 - After this, you can begin to mass warriors on all the empty tiles (mages in the water), and pave and make even more warriors. Upgrade your units when they level up.
Elemental Forest
Mage: Empowerment, Fire Focus, Poison Focus, Cold Focus, Destruction, Bypass Armor, Magical Might, Absorption Abortion, Explosive Mana

Skill Build:
Mages In The Middle / Mass MagesLevel 2: One of Each (Only Fire for mass mages)
Level 3: Debuff/Slow (Half/Half)
Level 4: Generalist
Level 5: Destruction
Level 6: Massive Damage
Level 7: Generalism
Mages At The Ends
Level 2: Poison
Level 3: Debuff
Level 4: Specialism
Level 5: Inflictor
Level 6: Large Increase
Level 7: Specialism
Level 8: Large Increase
Strategy:
1 - Start off with the 4 mages in the middle, upgrade them at the end of wave 2 or 3, depending on how good/bad you're doing.Upgrade them for a bit.
2 - Once you have no more upgrades for a while, and have lots of cash, pave and make 2 mages on the ends of the strips.
3 - Upgrade everyone... when you have tons of cash again (maybe wave 13 or something?) Just pave the space in between your 4 mages, and on the other strips of land, and mass mages. Don't upgrade them till after wave 16 (the one with fire absorb), then upgrade them as much as you want.
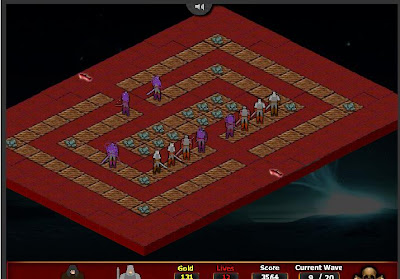
Curious Stones
Mage: Empowerment, Energy Focus, Poison Focus, Cold Focus, Destruction, Bypass Armor, Magical Might, Absorption Abortion, Explosive Mana, Mana Degradation
Unit Build:
Top MageLevel 2: Energy
Level 3: Infect
Level 4: Specialism
Level 5: Inflictor
Level 6: Large Increase
Level 7: Specialism
Level 8: Large Increase
All Other Mages
Level 2: Energy/Cold(Half/Half)
Level 3: Debuff/Slow (Half/Half)
Level 4: Generalist
Level 5: Destruction
Level 6: Massive Damage
Level 7: Generalism
Strategy:
1 - Start off with the 3 mages in the triangle formation near the middle. Add in the mage at the top, and the 3 mages at the bottom when you have the chance.2 - Upgrade the 3 mages at the bottom only for a bit, until it looks like you might leak the wave, then upgrade the middle and top guys.
3 - Upgrade Upgrade Upgrade, then once you have gold, pave tiles and mass more mages.
Path To Shoreview
Mage: Empowerment, Fire Focus, Poison Focus, Cold Focus, Destruction, Bypass Armor, Magical Might, Absorption Abortion, Infliction, Mana Degradation, Mana Exploitation

Unit Build:
All MagesLevel 2: Poison
Level 3: Infect
Level 4: Specialism
Level 5: Inflictor
Level 6: Large Increase
Level 7: Specialism
Level 8: Large Increase
Level 9: Holy
Strategy:
1 - Build the mage in the middle. Upgrade it whenever it levels.Fallen Mines
Mage: Empowerment, Fire Focus, Poison Focus, Cold Focus, Destruction, Bypass Armor, Magical Might, Absorption Abortion, Explosive Mana, Mana Degradation, Mana Exploitation
General: Hardy

Unit Build:
MagesLevel 2: Fire if red / Cold if Blue
Level 3: Slow (Half/Half)
Level 4: Generalist
Level 5: Destruction
Level 6: Massive Damage
Level 7: Generalism
Strategy:
1 - Start off by building the 2 blue mages and one red mage, and add in the other red mage whenever you have the time. Don't upgrade your red mages.2 - As soon your blue mages level, upgrade them. In order to win this level, you have to upgrade them as soon as they level. By wave 3 you should have your blue guys upgraded to level 5. If you don't, then either you're unlucky, or you didn't upgrade them fast enough. Continue upgrading your blue mages.
RBW4, your blue mages should be fully upgraded. During wave 4, only upgrade one of your blue mages (the 1st one that levels up). Do not upgrade the other blue mage.
3 - RBW5: Upgrade your red mages to the maximum level they can be upgraded to.
The Concert
Warrior: Ferocity, Lava Forging, Energetic Forging, Physical Forging, Archery, Intimidation, Armor Ignore, Stunted Absorption, Battlefield Tactics, Imbued Arrows, Intense Training, Brutal Training, Tactical Negation
Unit Builds:
Purple Marked WarriorsLevel 2: Energy
Level 3: Critical
Level 4: Generalism
Level 5: Archery
Level 6: Damage
Level 7: Generalism
Level 8: Damage
All Other Warriors
Level 2: Fire
Level 3: Critical
Level 4: Generalism
Level 5: Tactician
Level 6: Damage
Strategy:
1 - Start with 4 warriors in bottom (2 purple marked, and the 2 fire ones next to them) . Upgrade them all to level 3.As soon as you have the money during wave 3 (after upgrading everyone to level 3), add the 2 purple warriors up top.
2 - RBW4: Add 2 fire warriors on the bottom and the one purple to the left.
Upgrade your top 2 warriors/left warrior to level 3.
3 - RBW6 and during wave 6, upgrade everyone to level 4. Do so for your new units as well.
4 - RBW8/During W8: Upgrade everyone to the max, and add the 2 warriors on the bottom.
The picture stops after Wave 8. Begin to fill the inner circle bottoms up with warriors. Should be done by wave 10.
5 - Upgrade everyone as soon as they level, start filling the outer ring bottoms up as well. Upgrade everyone before you start adding more warriors. I had the map full at around wave 17.
6 - Continue to upgrade and mass.
The Frog Puddle
Warrior: Ferocity, Lava Forging, Noxious Forging, Physical Forging, Archery, Intimidation, Armor Ignore, Stunted Absorption, Battlefield Tactics, Intense Training, Brutal Training, Tactical Negation
General: Hardy, Tough

Unit Build:
WarriorsLevel 2: Fire/Poison (Red Guys Fire, Green Guys Poison)
Level 3: Consecrate
Level 4: Generalism
Level 5: Tactician
Level 6: Damage
Strategy:
1 - Start off with 3 in mid, add in 2 on both sides, try to wait till 50g so you can add each pair at the same time.2 - During waves 2-3, upgrade the red ones to the max as soon as they level.
3 - RBW4: Upgrade your green guys to the max. Continue upgrading them during waves 4 and 5.
4 -RBW6: Upgrade your fire guys to the max.
5 - After this, just upgrade anyone whenever they level.
Not So Vast Forest
Mage: Empowerment, Fire Focus, Energy Focus, Cold Focus, Destruction, Bypass Armor, Magical Might, Absorption Abortion, Explosive Mana, Mana Degradation, Mana Exploitation,
General: Frugal, Hardy, Tough, Indomitable

Unit Build:
All Other Mages
Level 2: Energy
Level 3: Debuff/Slow (Half/Half)
Level 4: Generalist
Level 5: Destruction
Level 6: Massive Damage
Level 7: Generalism
Strategy:
1 - Start building mages according to the picture from the middle outwards. Fill every tile.2 - Don't upgrade your mages at all till wave 7.
3 - RBW7: Upgrade all your mages. Continue upgrading them as soon as they level.
Note: Probably not the best way to do it, you could probably upgrade earlier than wave 7 and incur less lives lost, but it worked for me with 2 lives to spare, and is really easy to follow.
Spine Of Kraxos
Warrior: Ferocity, Cold Forging, Energetic Forging, Physical Forging, Archery, Intimidation, Armor Ignore, Stunted Absorption, Battlefield Tactics, Intense Training, Brutal Training, Tactical Negation
General: Hardy, Frugal, Miser, Skintflint

Unit Build:
MagesLevel 2: Energy
Level 3: Debuff/Slow
Level 4: Generalism
Level 5: Inflictor
Level 6: Large Increase
Level 7: Generalism
Warriors
Level 2: Energy/Cold (the ones right below the mages have to be energy, Half/Half)
Level 3: Consecrate
Level 4: Generalism
Level 5: Archery for the ones right below the mages / Tactician Otherwise
Level 6: Damage
Strategy:
1 - Start off with 4 warriors, 2 per side at the very bottom. Upgrade them to level 2.RBW2: add the 4 mages in the middle.
During wave 3, add the 4 warriors between those 2.
RBW5: Upgrade your mages to level 2.
RBW6/During: upgrade your mages to level 3
RBW7: Upgrade all your warriors to level 3.
2 - I lost a bunch wave 11, so upgrade your mages to level 4 before then to prevent that.
Upgrade your 2 warriors right before mages to level 4.
Now, split your upgrades between your warriors and archers.
Wave 15 is another air wave, try to get your archers to level 5.
Upgrade whoever whenever from now on, focusing on your warriors/archers
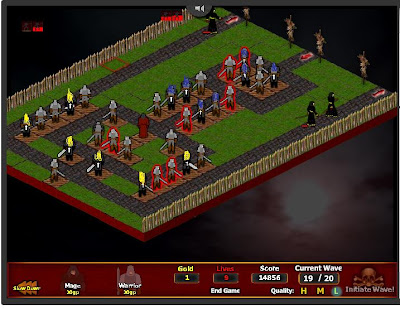
The Old Throne
Mage: Empowerment, Fire Focus, Energy Focus, Destruction
Warrior: Ferocity, Lava Forging, Energetic, Physical Forging, Archery, Intimidation, Armor Ignore, Stunted Absorption, Battlefield Tactics, Intense Training, Tactical Negation, Brutal Training,
General: Frugal, Miser

Unit Builds:
Teal Warriors:Level 2: Fire
Level 3: Consecrate
Level 4: Generalism
Level 5: Archery
Level 6: Damage
All Other Warriors:
Level 2: Fire/Energy (Half/Half)
Level 3: Consecrate
Level 4: Generalism
Level 5: Tactician
Level 6: Damage
4 Top Mages:
Level 2: Fire (2 closest to the bottom platform) / Energy (2 other ones)
Level 3: Infect (closest) / Debuff (others)
Level 4: Specialism
Level 5: Inflictor
Level 6: Large Increase
Level 7: Specialism
Level 8: Large Increase
All Other Mages:
Level 2: Energy/Fire(Half/Half)
Level 3: Debuff/Slow (Half/Half)
Level 4: Generalist
Level 5: Destruction
Level 6: Massive Damage
Level 7: Generalism
1 - Start with 4 mages up there. Add the 2 teal warriors, then the 4 yellow warriors, then fill the bottom row with mages as shown in the picture.
RBW6/During, upgrade the 2 top mages closest to the platform to level 3.
Finish filling the tiles with warriors, according to the picture.
2 - Start upgrading everyone to level 2, doing your bottom platform mages last. Upgrade your teal marked warriors and top 4 mages to level 4.
RBW11: Upgrade the rest of your mages to level 3
Upgrade your top 4 mages/teal warriors asap from now onto the end of the level.
3 - Upgrade your warriors/mages evenly now (asap the ones mentioned earlier).
4 - RBW24, I would just fill the remaining tiles with warriors.
Should be no more leaks, except maybe 1 or 2 during wave 24 (I didn't fill everything with warriors though).
Captured Shipyard
Skill Points:
Warrior: Ferocity, Cold Forging, Energetic Forging, Physical Forging, Archery, Intimidation, Armor Ignore, Stunted Absorption, Battlefield Tactics, Intense Training, Brutal Training,
General: Hardy, Tough, Indomitable, Frugal, Miser, Skintflint, Teacher
Unit Build:
WarriorsLevel 2: Physical
Level 3: Consecrate
Level 4: Generalism
Level 5: Tactician
Level 6: Damage
Level 7: Generalism
Strategy:
1 - Start with the 6 warriors near the bottom (the yellows)Upgrade them as soon as they level, ASAP.
2 - RBW5: Add mage on bottom. (I would just replace this with a warrior)
RBW7: add the 7 wars up top (the blues)
Upgrade them as soon as they level.
During wave 8, just finish up putting warriors on the tiles.
3 - At this point, upgrade the original 13 warriors you have, then upgrade the ones you massed whenever they level. When you get tons of cash, pave and place warriors like i did according to my picture. I may have palced too much though, so consider paving/placing 4 less warriors than I did.
Stonefield Border
Skill Points:
Mage: Empowerment, Fire Focus, Energy Focus, Cold Focus, Destruction, Bypass Armor, Magical Might, Explosive Mana
Warrior: Ferocity, Cold Forging, Energetic Forging, Physical Forging, Noxious Forging, Archery, Intimidation, Armor Ignore, Stunted Absorption, Battlefield Tactics, Intense Training, Brutal Training
Unit Builds:
Blue Marked Mages:Level 2: Energy
Level 3: Debuff
Level 4: Specialism
Level 5: Inflictor
Level 6: Large Increase
Level 7: Specialism
Level 8: Large Increase
All Other Mages:
Level 2: Fire/Poison(Half/Half)
Level 3: Slow
Level 4: Generalist
Level 5: Destruction
Level 6: Massive Damage
Level 7: Generalism
Warriors:
Level 2: Fire/Poison (Half/Half)
Level 3: Consecrate
Level 4: Generalism
Level 5: Tactician
Level 6: Damage
Strategy:
1 - Start with the 2 warriors closest to the middle.RBW2: add the 2 mages marked in blue.
RBW4: add the 2 mages marked in yellow
RBW5: add 3 mages marked in red.
RBW6: add the last mage marked in red.
During W6: Add 2 more mages near the blue marked ones.
During W7: Complete the picture with the last 2 mages and warriors.
Upgrade everyone to level 2, starting from the back.
Start upgrading mages to level 3, for wave 11.
Upgrade mages to level 4.
RBW16: Upgrade warriors to max evenly (doing back then front, back then front).
2 - Upgrade everyone evenly now.
Lighthouse Ruins
Mage: Empowerment, Fire Focus, Cold Focus, Poison Focus, Destruction, Infliction, Explosive Mana, Bypass Armor, Magical Might, Mana Degradation, Mana Exploitation
General: Frugal, Miser, Skintflint, Builder, Erector, Constructor, Joinery, Teacher, Instructor (I almost died though, so consider swapping these for lives)

Unit Build:
Topmost MagesTop Mage
Level 2: Fire
Level 3: Infect
Level 4: Specialism
Level 5: Inflictor
Level 6: Large Increase
Level 7: Specialism
Yellow Marked Mages
Top Mage
Level 2: Cold
Level 3: Debuff
Level 4: Specialism
Level 5: Inflictor
Level 6: Large Increase
Level 7: Specialism
All Other Mages
Level 2: Fire/Cold(Half/Half)
Level 3: Slow
Level 4: Generalist
Level 5: Destruction
Level 6: Massive Damage
Level 7: Generalism
Strategy:
1 - Start off with the 2 blue marked MagesRBW2: Then the 2 black marked mages
RBW3: Then the 2 mages (all the way up top)
RBW4: Then the 2 yellow marked mages, upgrade your 4 middle mages to level 2.
RBW5: Pave and make the 2 pink marked mages.
RBW6: Upgrade everyone to level 2. Upgrade ur topmost guys to level 3.
I had the mage at the bottom because i didn't upgrade my topmost guys to level 3.
2 - Now upgrade everyone to level 3.
Then upgrade everyone to level 4, but do your topmost guys last.
Now upgrade whoever whenever, but doing your topmost guys last.
3 - RBWave 16, you should have lots of gold, so pave and make some more mages. Upgrade stuff before you pave though. These mages didn't really do much for me though: consider making warriors instead.
4 - Upgrade Upgrade Upgrade. I made the other 2 squares wave 21, but it wasn't worth it. You can skip that.
Wave 22 is tight: be sure to upgrade everything asap.
Lighthouse Ruins
Skill Build:
Mage: Empowerment, Fire Focus, Energy Focus, Speed Casting, Destruction, Magical Might, Bypass Armour, Explosive Mana, Absorption Abortion, Mana Exploitation, Mana Degradation, Magical Manipulation
General: Frugal, Miser, Skintflint, Hardy, Tough, Indomitable, Teacher, Instructor, Altered States

Unit Build:
Level 2: Fire
Level 3: Debuff/Slow (Half/Half)
Level 4: Generalist
Level 5: Destruction
Level 6: Massive Damage
Level 7: Generalism
Warriors:
Level 2: Physical
Level 3: Critical
Level 4: Generalism
Level 5: Tactician
Level 6: Damage
Strategy:
1 - Start off building and completing the mage setup in the picture.Upgrade evenly, except rush 2 units per side to level 3, and rush all level 4 to level 5. (when i say rush, i mean the 1st level 2 unit that can be upgraded to level 3 should be, even if you haven't upgraded everyone to level 2 yet)
Prioritize the 2 mages per side closest to the middle corridor.
2 - At around wave 13 you should have lots of gold, so fill up the top and bottom squares with warriors. Upgrade everyone when they level, focusing on mages first.
When you reach the point where the enemies die before they even reach the bottom, stop upgrading your mages and focus on your warriors.
3 - At around wave 21, you should have lots of gold, and since you shouldn't upgrade your mages any further, go ahead and fill out every square with warriors. The picture doesn't cover this because it looks messy.
4 - At the final boss level just focus on upgrading the warriors on 1 square to a very high level (7 or so). You need about 5 lives in order to beat this.
Walkthrough made based almost completely in
Edit: We copy pasted NorthernPolarity's walkthrough, and made some extremely minor, insignificant edits.
| |  | |  | |


Hey man you did a great job in the first walkthrough, so when I did a search to help me with the not so vast forest and saw your name attached I thought, nice!
ReplyDeleteHowever, I do not see a not so vast forest screen shot here, and you have the Forgotten Bridge, which I don't have available on my map.
I'm confused! I guess I'm just asking, are there different maps?
I have the same issue as staff 23. I do not have Forgotten Bridge either. Perhaps you were playing a different version of the game, or did it in a different order?
ReplyDeleteThe forgotten bridge becomes available after completing the elemental forest (if following this guide).
ReplyDeleteSimply move ahead, and backtrack once it becomes available.
For the Not So Vast map my solution was:
ReplyDeletewarrior opener > Poison blade
mage opener > energy
general > extra lives + cheap hiring
and pavement if you have too much skills lying around
strategy is filling the entry points with mages and middle section with poison warriors as much as possible. just keep filling them without upgrading. pave and spam warriors. at first mushroom make the warriors poison. then consecrate and generalize them. the mages are energy and general.
the last boss goes down easily with consecrated poison blades.
hm got problems with the missing "forgotten bridge" map. if i go one with the next maps, i have missing skill pts or something else.
ReplyDeleteOld Shaven Road
that map never works with that tactic, dont know if that is because of the missing skill point.
The forgotten bridge comes after you beat Old Shaven Road!
ReplyDeletehmmm.
ReplyDeleteThe only problem that I have with this is that its STOLEN!
Northern Polarity of C.O.C.A.K. took time to write this, not for jackasses like you to steal!
This site owns this walkthrough: http://cocak.blogspot.com/2008/07/protector-reclaiming-throne.html
Not you!
thank you, d00terr
@ d00terr: Maybe you should read before write next time.
ReplyDeleteIf you weren't THAT blind in anger you'd probably notice the proper credit given.
Apparently that is a hell lot of words for you to read so I'll do you a favour and I'll repeat them here.
"...Walkthrough made based almost completely in NorthernPolarity's job at Cocak"
PageRank 5 link from a site with 10 times more visits than Cocak included.
So... I really don't want to discuss Intellectual Property Rights with a random kid in the net.
If you have a real issue and you're ready to talk seriously write me: legal@CafeCafeGames.com
hi, thank you for the walkthrough was very useful on some lvls i was having trouble with.. are you planning to update with the remaining lvls? one note, on curious stones you write half poison/energy where it should be half cold/energy.. happy hunting ^_^
ReplyDelete@Cafe_Cafe There are so many things wrong with your reply to d00ter.
ReplyDeleteFirst of all, even if d00ter were to read the entire walkthrough (which generally isn't the case since I would think that most people would only use it when they're stuck on a certain section), I doubt that they'd even notice the tiny 8 font single line crediting NorthernPolarity. Since people generally don't read the entire walkthrough, I doubt that sticking your proper credit at the very end of the walkthrough helps either.
And about that "proper credit". I was comparing this walkthrough to the one on COCAK, and the only differences I see are the removal of the introduction and changing the caps lock to bold. Since you say that this walkthrough is "based" on NorthernPolarity's walkthrough, I would expect some revision of strategies to make it more smoother, rewording of strategies to make it sound better, hell even redoing the pictures so instead the ugly circles present, there are nice numbers on top of the mages or something. But you didn't even do that. You even left the parts that began with an asterisk that sound completely unprofessional. Your "proper credit" sentence should be reworded to "We copy pasted NorthernPolarity's walkthrough, and made some extremely minor, insignificant edits so we could say that we made it."
Oh actually, you guys did seem to change something. you swapped the order of Old Shaven Road and The Forgotten Bridge levels.Judging from the comments, I see that your only major change to the walkthrough has worked extremely well for your readers.
I'm disappointed of how when I looked up "Protector Reclaiming The Throne Walkthrough", the first link had this crappy, plagarized walkthrough in it. The COCAK one looks much better.
PWNT... whoever anonymous is, they did i good job pwning you... im just sad i didnt beat them to it :P Northern polarity even noticed, im talking to them on kongregate right now
ReplyDeleteI really liked the idea :)
ReplyDeletePost updated, read the bottom part.
Everyone just realised the best way to defeat Not So Vast Forest, lol can't believe I didn't think of it sooner. Just invest 2 or so points in the increase lives skill tree, makes the enemies go through twice^^.
ReplyDeleteThe very BEST tactics for Not so Vast Forest map (on normal):
ReplyDeletePlace only 2 mages so they hit the mobs at the 2 entry points and also on the middle. Train them with cripple and specialism, infliction etc. Focus only on the cripple stuff. So u can beat it with only 2 mages, they will have also nice levels at the end.
THIS IS GREAT! EVERYTHING WORKED FOR ME! THANKS! YOU'RE AN ABSOLUTE GENIUS!
ReplyDeleteFor Not So Vast Forest i just maxed out lives and used as many poison warriors with high level consecrate as possible^^ Poison consecrate pwns the snake at the end.
ReplyDeletei used energy warriors
ReplyDeletefor not so vast
i dont remember my build but i had one life left
the snake was super easy
Sorry but the WT for the map 'The Concert' doenst work... on lvl 10 there's a flying enemy and the two archer guys cant kill it...
ReplyDeleteThe only problem is when you get to "The Old Throne" you have one skill point to many. You only have 17 at that point, but great other wise!
ReplyDeleteHey, I reached the final map before I had to get help and thx for it :).
ReplyDeleteOne question, wouldn't it be more efficient to use purple mages instead of red? Considering the last mob is strong vs fire and absorbing?
Well i did it, but did it differently.
ReplyDeleteFirst: You can't just take it with energy, the red rounds fly through
Second: The final boss hardly made a round in the first square.
I did it by using red mages, 6 on each side. 2 are close to the middle, a free space and then 4 more reds (so they can hit as much as possible).
My purple mages where in placed 1 square away from the corner square, so they can hit as much as possible. Had 4 on each side in the top (where the mobs move past twice).
In the end, my purple mages hit legendary status (against the final mob) and took him out easy.
Around lvl 13 or something, I started using knights in the bottom and slowly filling up.
But mages did majority of damage and remember to use destruction.
Just my 5 cents, GL & HF :)
And forgot to mention, I didn't take altered states, but instead i went with hardy, scouts, telescopes, camouflage (enemies had 10% less hp in total)
ReplyDeleteat Stonefield Border ur using 20 skillpoints but at that point we only have 19, so :P yeah
ReplyDeleteForgotten Bridge Screenshot doesn't match your instructions.
ReplyDeleteThanks a lot for your guide!
ReplyDeleteUhm...
ReplyDeleteQuite your plagarising whinging. The original blog has been removed.
Other than that, this turned an almost impossible (and boring) game into the best TD I have ever player!
All applause to original author!
some of you are idiots, some of you aren't. walkthroughs aren't ever the greatest, simply because of the fact that they don't know EXACTLY what ur doing, can't say 'oh you screwed up here, fix this" instead they give a basic format and then expect it to be mostly true. in fact i had an easy time beating not so vast forest with just 4 skill points. 3 on lives and frugal. then just keep putting poison warriors with consecrate in the middle, where they hit everything twice. there are some leaks, but it works, as long as you put the warriors to make it right.
ReplyDeletei hate it when people complain about a walkthrough. its a basic format, a general outline. some games there are only one solution. this isn't one of them. on this kind of a game, take the general idea, and then (oh the horror) use ur brain and think of a new strategy (even if its just with a few minor changes) and beat it. amazing! who knew!
i do believe that this is stolen. giving someone credit for doing something but taking it without their permission is still stealing. i stole your idea to make guns with bullets. ok so i say it was your idea, but without your consent, it is still a stolen idea (not sure if this is the greatest example[if it makes it easier, replace "gun with bullets" with something very simple]) like this example, it makes sense in my mind, but may not in yours. in fact, you may need to edit what i said a little to make it work for you. the same general principle applies with walkthrough.
btw. NorthernPolarity, obviously you aren't here or ever here because if you were you would have given at least a 5 page rant, or at least said something, but great job. however, if you DID design the walkthrough here, or at least the section about the captured shipyard, followin ur instructions, it doesn't work, and if i can count (pray to god i can =D) then u have 1 extra skill point. but then i completed the 3 maps after it and still wasn't able to do it.
and before you go calling me an idiot/hypocrite, yes i did retry the map. yes i did do different things (i thought archers would be easier cuz they have a longer range and a lot of creeps were slipping past with like2-30 health left/changed the order in which i placed things AFTER the blue marked guys/saved money and didn't upgrade as much but placed more guys. my main attempts, but sadly failures). mmm time to try again =D
oh and TY NORTHERN POLARITY FOR MAKING THIS, A GREAT HELP
2) THANK YOU FOR MAKiNG IT OBVIOUS THAT YOU "copy pasted..... minor insignificant edits" and that "walkthrough made based almost completely in NorthernPolarity's job at Cocak"
3) thank you for reading my entire long rant/explanation/attack on others/comment. if u actually read the entire thing, i applaud you. if not thats fine, i probably wouldn't read someone else's freakishly long rant anyways =P
btw shout me on kong if u have anthing else to say, i probably won't ever look at this again =P
ReplyDeleteshout it out on krystar's profile.
if i was offensive i'm sorry, some things just tick me off =)
i did what it said and still lost =(
ReplyDeleteOmg like 3 of the maps what I tried I lost!!! these walkthroughs sucks!! I did excatlly what you said in that tutorial -_-
ReplyDeleteDid you have all the skills? Did you upgrade the protectors or not when you should? Typical prolems, just pay attention and do the maps in the order written here to get skill points to spend.
ReplyDeletehe doesn't want us to see that he is playing on Coward difficulty! that's why sometimes it doesn't work!
ReplyDeleteFor me this walkthrough was shit. I ussed it only for the last map. First of all the title of the last map is written wrong. Second I followed this walkthrough step by step and got beaten at W13. Luckily I managed to beat the map on my own later.
ReplyDeleteIf I knew how. I would write my own walkthrough :p
for stonefield border make two wars in front archers and upgrade them speed, start out with just 1 and wen u make that one an archer make another
ReplyDeleteWUTS WRONG WITH U!!!! ON THE LAST LVL THE LAST BOSS ABSORBS FIRE, Y WOULD U SAY MAKE ALL FIRE MAGES. I WENT FROM 22 LIVES TO 7 WITH LVL 1 WARS (THEY MADE IT TO LVL 8) AND LVL EIGHT FIRE MAGES WITH 28SOMETHIN ATK
ReplyDeleteHmm, I've used the tactics you have suggested on "The Concert", and it works, but I don't understand why you made it so complicated.
ReplyDeleteI just built one warrior as close to the entrance as I could, waited until the second wave before I upgraded him to fire, then I just upgrade him whenever I get the chance using the following steps.
Level 2: Fire
Level 3: Berserk
Level 4: Generalist
Level 5: Archery
Level 6: Speed
Level 7: Generalist
Level 8: Speed
Level 9: Holy Vision
You do not need any more units, and you won't leak.
Edit
ReplyDeleteLevel 9: Vision Blessed
Evil Stronghold - Can someone help me with this board. It does not appear to have a walkthrough and is the last board.
ReplyDeleteNice tactic, too bad it doesnt work, at all...
ReplyDeleteI tried it with maxed skills and you cannot survive the first wave, even if you time your upgrade well. I guess you were playing in coward mode?
Anonymous Said,
Hmm, I've used the tactics you have suggested on "The Concert", and it works, but I don't understand why you made it so complicated.
I just built one warrior as close to the entrance as I could, waited until the second wave before I upgraded him to fire, then I just upgrade him whenever I get the chance using the following steps.
Level 2: Fire
Level 3: Berserk
Level 4: Generalist
Level 5: Archery
Level 6: Speed
Level 7: Generalist
Level 8: Speed
Level 9: Holy Vision
You do not need any more units, and you won't leak.
Posted on October 21, 2009 11:20 PM
That tactic actually works if you modify it for normal mode. you have to put 2 warriors at the entrance near the top of the screen (right near where the creeps exit). Then put another warrior at the other side of the maze, one ring closer towards the middle from the other 2 warriors, where it can hit the creeps as they come from both directions.
ReplyDeleteLevel the 2 warriors at the entrance in the sequence that anonymous laid out, and level up the lone warrior up to level 4 using that same sequence, then leave him be and just level the other 2. You'll leak some, but if you have all the required warrior skills and extra lives etc... you can beat it just with those 3.
Upgrade the
I just realised. Red and yellow on Forgotten Bridge are reversed.
ReplyDelete